Lab 1: Setup; Using Git
Due Date: January 18
Objectives
- Get student laptops ready to build applications
- Install and configure Git on your laptop
- Learn basic Git functions through exercises
Due Date: January 18
Objectives
For Mac users, you can install Ruby/Rails locally very easily. Because Mac just runs Unix under the hood, these instructions work for most flavors of Linux as well.
Get Xcode: You will need Apple's Xcode installed first and get its command-line tools working. It is a free download from the App Store, but it is large and will take some time. Once installed, open Xcode and go to Preferences / Downloads and install the Xcode Command Line Tools.
Install Homebrew: Homebrew is a package manager for the Mac that makes installing new software very easy. You can install this tool with this terminal command:
ruby -e "$(curl -fsSL https://raw.githubusercontent.com/Homebrew/install/master/install)"
Once it is installed, run brew doctor to see if there are any issues that need to be fixed.
Install Git. There is an official page for installing git at http://git-scm.com/book/en/v2/Getting-Started-Installing-Git. Go to the page and follow the instructions for Mac. Verify this was installed by running git from the terminal.
Install Ruby Version Manager: RVM is a nice tool to switch between multiple versions of Ruby. Install it with the following command:
\curl -sSL https://get.rvm.io | bash -s stable
Once it is installed, either restart your terminal or use the command source ... that RVM gives you at the end of the installation to get RVM active. Then install Ruby 2.5.7 with the command rvm install 2.5.7
Install nodejs: Use homebrew to install nodejs with the command brew install nodejs
Install rails: gem install rails -v=5.2.3 --no-document
Test your installation: We will build a simple test app using the command line. Open up terminal and switch to the Documents directory by typing cd Documents or whatever directory you keep 67-272 files. After that, create the rails app with the following commands.
rails new testapp
# (you'll see a bunch of output)
cd testapp
rails server
You can test that this works by going to localhost:3000 in your internet browser and seeing a basic rails splash page.
With regard to browsers, Chrome or Firefox are acceptable. If using Firefox, be sure to get the following add-ons:
This semester, however, we will be featuring Google Chrome, because of some extensions we will be working with later in the semester and beyond, including Vue.JS DevTools.
Finally, Prof. H has also made his dotfiles available online if you want to customize your command line so that it matches what you see in lectures. The README file has instructions on how to install these files.
For Windows users, we recommend you use Windows Subsystem for Linux to do your app-building in 67-272. One of our TAs, Matt Kern, wrote up a set of install instructions that you may find useful. Matt's original instructions can be found on Github and he based most of his write-up based on installation instructions found at these Windows docs
Enable-WindowsOptionalFeature -Online -FeatureName Microsoft-Windows-Subsystem-Linux
Restart your computer when prompted
Install Ubuntu 18.04 on WSL. Find Ubuntu 18.04 in the Windows store and select "Get" on the distro page and then "Install".
Initialize your Ubuntu installation
sudo apt update && sudo apt upgrade
Nice work, now a few helpful things:
ls will list everything in the working directory. Right now you will probably see nothing.pwd will print the working directory (where you are right now)cd [some path] will change the current directory to the given path. cd /mnt/
or, you can probably get all the way to your Documents folder with
cd /mnt/c/Users/[your windows username]/Documents
mkdir 67272 # creates a folder named 67272
sudo apt-get install gnupg2
Note: unless otherwise specified all of these instructions are meant to be run in the Ubuntu installation you just set up.
gpg2 --recv-keys 409B6B1796C275462A1703113804BB82D39DC0E3 7D2BAF1CF37B13E2069D6956105BD0E739499BDB
\curl -sSL https://get.rvm.io | bash -s stable
Close your bash shell and open a new one (or source ~/.bashrc should work)
Install Ruby 2.5.7 rvm install 2.5.7 (this will take a while)
Set default Ruby version
bash --login
rvm --default use 2.5.7
Close and re-open WSL (Ubuntu)
Check installation. Run rvm list on the command line. You should see =* ruby-2.5.7 in the output.
curl -sL https://deb.nodesource.com/setup_12.x | sudo -E bash -
sudo apt-get install -y nodejs
gem install rails -v=5.2.3
We are going to create a trivial web app. Make sure you are in a
folder that you want to be in. Use cd (and maybe mkdir) as explained
in the WSL setup instructions. The new app will be created in its own
folder so no need to make a specific one.
Create an application with the name "testapp" with rails new testapp
(this may take a little while)
Change directories into the new application with cd testapp
Install the new app's dependencies with bundle install. This will take a while. You may have to try this multiple times. If it fails in a consistent way then seek help.
Run the application with rails server
Open your browser and put localhost:3000 in the
address bar (or open the link)
You should see the basic rails splash page:

Congrats, you did it! When you are done CTRL c will stop the server.
File>Open Folder and then select the testapp you createdIf you installed locally on your Mac, please be sure Git is installed properly before continuing. If you don't already have it, you can get a download at https://git-scm.com/download/mac.
There are a number of graphical user interfaces available for Git if you installed locally on a Mac, but using the command line to manage Git is easy and will be what we use for all lab instructions. For the remainder of the lab today, we recommend you use the command line.
There are a number of online resources for Git. There is a nice cheat sheet here. Open one of these now in a browser for reference purposes. Also note some nice Git resources at www.gitready.com that might also be helpful later in the course.
Setup your git installation with your author information. That way, when you make a commit, you are "signing" it so other developers know who made the commit.
 git config --global user.name "Your Name"
 git config --global user.email "your@email.address"
Note: The quotations are important.
(optional) If you installed locally, you can also configure your .gitconfig file to make output certain colors and handle other basic chores. My .gitconfig file can be seen in my dotfiles repo on github if you are looking for an example.
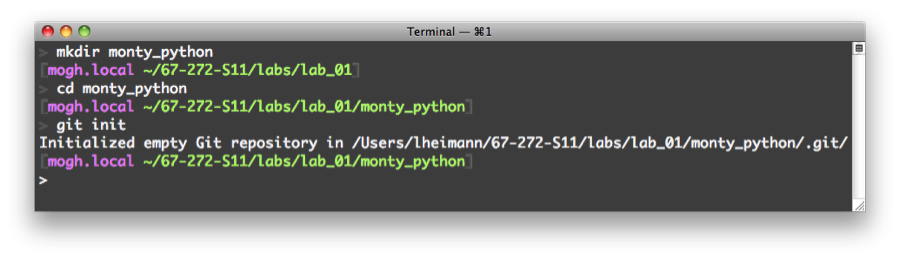
To get a feel for how Git works without getting bogged down by code, we are going to set up some simple text files with material from various Monty Python movies and skits. Start by creating a folder or directory somewhere called 'monty_python' and then switch into that directory. Now in that directory we will create a new git repository by typing:
git init
Here's a screenshot to help:
Within your working directory, create an empty file called holy_grail.txt:
touch holy_grail.txt
Now check that the file is untracked and needs sent to staging:
git status
Add the file to the staging area:
git add holy_grail.txt
Tip - You can hit
git status again and verify that the file is ready to commit.Here's a screenshot that may be helpful:

Following the same previous steps, add another file called life_of_brian.txt to the working directory.
Commit the files in staging to the repository:
git commit –m "Holy Grail, Life of Brian files added to project"
Tip - good messages are useful; always include a description message using the –m flag!
git status. Double check the change by running git log to see the list of commits:
b. Add a new file called completely_different.txt to the repository. Refer back to the previous instructions if necessary.
Show a TA that you have completed the first part. Make sure the TA initials your sheet.
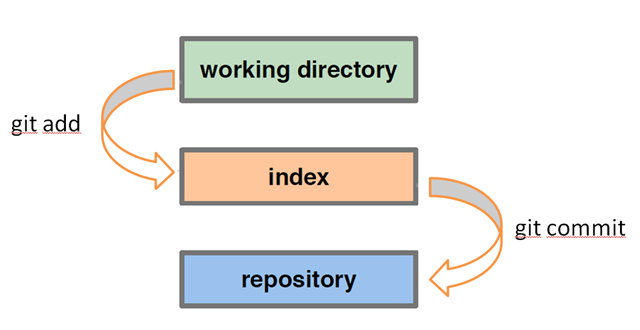
Now that we have a basic Git repository set up and know how to add files, we need to also learn how to remove files and how to compare versions of the same file in different levels. Let's start with removal. In the git status help, we saw the note that if we want to remove a file from the staging level.
Remove the holy_grail.txt by typing the following:
git rm holy_grail.txt
and verify that it's gone from your working directory.
Oh snap! We didn't want to delete the file! I meant to use git rm --cached. Don't worry, it hasn't been removed from the repository yet - we've just marked the file for deletion.
Get the file back by using checkout:
git checkout HEAD holy_grail.txt
Note - HEAD is a pointer to your most recent commit. This could also be the SHA value of any previous commit.
Add another famous quote to holy_grail.txt.
Use git diff to see what has changed:
git diff

Stage and commit these changes:
 git add holy_grail.txt
 git commit -m "Added another quote to holy_grail.txt"
Add another quote to life_of_brian.txt and stage the file (git add life_of_brian.txt), but do not commit.
Run git diff:
git diff
You should not see any output. This is because the changes are staged and ready to be committed. If you want to see the difference between the staged version and the repository version, specify the --cached flag:
git diff --cached life_of_brian.txt
Reverse your changes to life_of_brian.txt:
git rm --cached life_of_brian.txt
We have decided that the completely_different.txt file was unnecessary. Using git, remove the file. (On your own - see a TA if you need assistance)
(optional) Add another file called pointless.txt and stage and commit it. Since that was pointless, I want to move back to the previous commit; I can do this by typing git checkout master. (This is a relative commit name: master is the second most recent commit in master the branch. master~3 is the great grandparent (three before) of the most recent commit in the master branch.)
Notice now that the file pointless.txt is gone from your directory. You can get it back with git checkout master if you wish. I can also use absolute commit names and go all the way back to the beginning (in my case) with git checkout 24ac377, where this string is the commit name git assigned to my first commit (found it by using git log).
We need to add the new material from the Flying Circus to our project and to do this we will branch the project (if we don't like the changes, it will be very easy to just kill the branch and go back to master and try again – great way to safely experiment within the project).
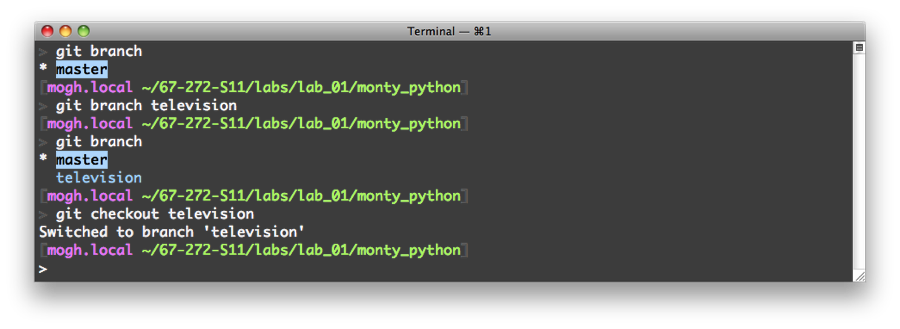
List all our current branches with:
git branch
The current (and only) branch is marked with a *.
Create a new branch called "television":
git branch television
Run git branch again to verify the branch exists.
Switch to the television branch:
git checkout television
Add a new file called flying_circus.txt with the quote:
"No one expects the Spanish Inquisition!"
Add this file to the repository with an appropriate message.
Return to the master branch:
git checkout master
You'll notice that the flying_circus.txt file disappeared! Not to worry - it will be back soon enough.
Create and switch to a new branch called "movies":
git checkout -b movies
Tip - in command, we created the branch and switched to it in one command by specifying the -b flag to git checkout.
On this new branch, add two new files:
touch meaning_of_life.txt mp_live.txt
Tip - touch is a *nix command for creating files
Commit these two files using what you learned earlier in the lab.
Checkout the master branch again (see previous commands for help).
Merge the movies branch back into the master branch:
git merge movies
Note - the branch movies still exists. If it's no longer needed, delete the branch with:
git branch -d movies
television branch.Notice that the new movie files are gone, but the flying_circus.txt is back in the working directory.
Add a new quote to flying_circus.txt (anything will do) and commit the change to the repository.
Merge the television branch back into the master branch (see #10..#11 for help).

There is obviously much more to Git, but this lab should get you familiar with the basics and started using Git and your proficiency should increase as you use it more in this course. Once the TA verifies the repo is set up, you are finished.
Be sure that the check-off sheet has your name clearly printed and is signed by a TA and take it with you as proof of lab completion.
This week for the "on your own" section, your job is to review HTML, CSS, and basic Javascript as needed. If you don't remember much from HTML & CSS, you can go back to the original 67-103 course site and review materials and assignments posted there. I have also posted some older review labs on github. I designed each lab a long time ago to be done in an hour or less for 67-101, so this should not be too hard to squeeze in the first week.